Welcome to digital planning! So you put GoodNotes on your iPad and downloaded your digital planner file….. now what? This is a visual walkthrough on how to get things set up and ready to go. Let’s get down to it!
How to import your planner file:

Step 1: Open GoodNotes
This is the GoodNotes home page. All of your notes will be displayed here.
GoodNotes gives you the option to view your notes as a list, or as icons. I have mine set up as icons, meaning I will see all my notebook covers lined up in a grid. You can change how you view your notebooks by pressing the list button that’s highlighted in yellow.

Step 2: Import your file
To add your file, click on the + icon and select import.
(You can also create your notes from scratch, using GoodNotes’ default notebook designs. They have a bunch of great options for types of paper, and I recommend checking it out. )
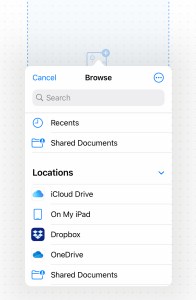
Step 3: Select your file
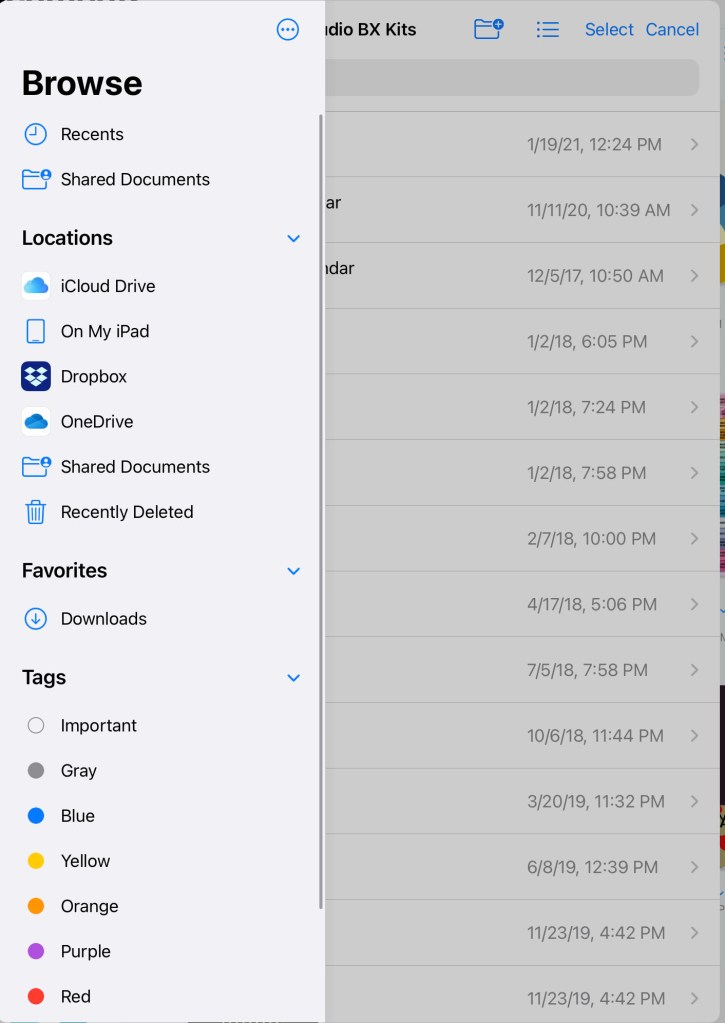
When you click on “import”, you’ll get a list of places to grab your file. (If you don’t see this screen, press “< ” on the top left side of the box until you see “< browse”. Then press that.)
I keep all my files on a cloud, but if you’ve downloaded the file directly to your iPad the file is most likely under “downloads.”
Find where your file is located and select it to add it to your GoodNotes app.

Step 4: Ta-Da!
Your file is now listed on the home page and ready to be used!
How to Delete, Copy, and Paste Pages
Studio Battleaxe planners come with a ton of page options, and the real beauty of digital planning is how easy it is to customize your notebook. Delete what you don’t want. Copy and page you like and use it over and over again.
Please keep in mind that interactive planners – planners with clickable tabs – are programmed a specific way. Page A will ONLY jump to Page B, so if you delete Page B…. that button no longer works and there’s no fixing it on your end. Studio Battleaxe planners have a delete warning on the top of every page that is connected to a link, so you don’t accidentally delete something you shouldn’t.

Method 1: Multi-Page View
To access multi-page view, click on the 4 square icon in the top left corner of the page. From this screen, you can see thumbnail images of all the pages in the planner.

Click on the small arrow below the page you want, and a menu will pop up with options.
Instead of the traditional copy-paste function here, GoodNotes has a duplicate button. If you press duplicate, the copied page will appear to the right of the page you just copied. From this point, you can drag and drop that page to the location you want it to be.
To delete a page, simply click on “Move to Trash.”
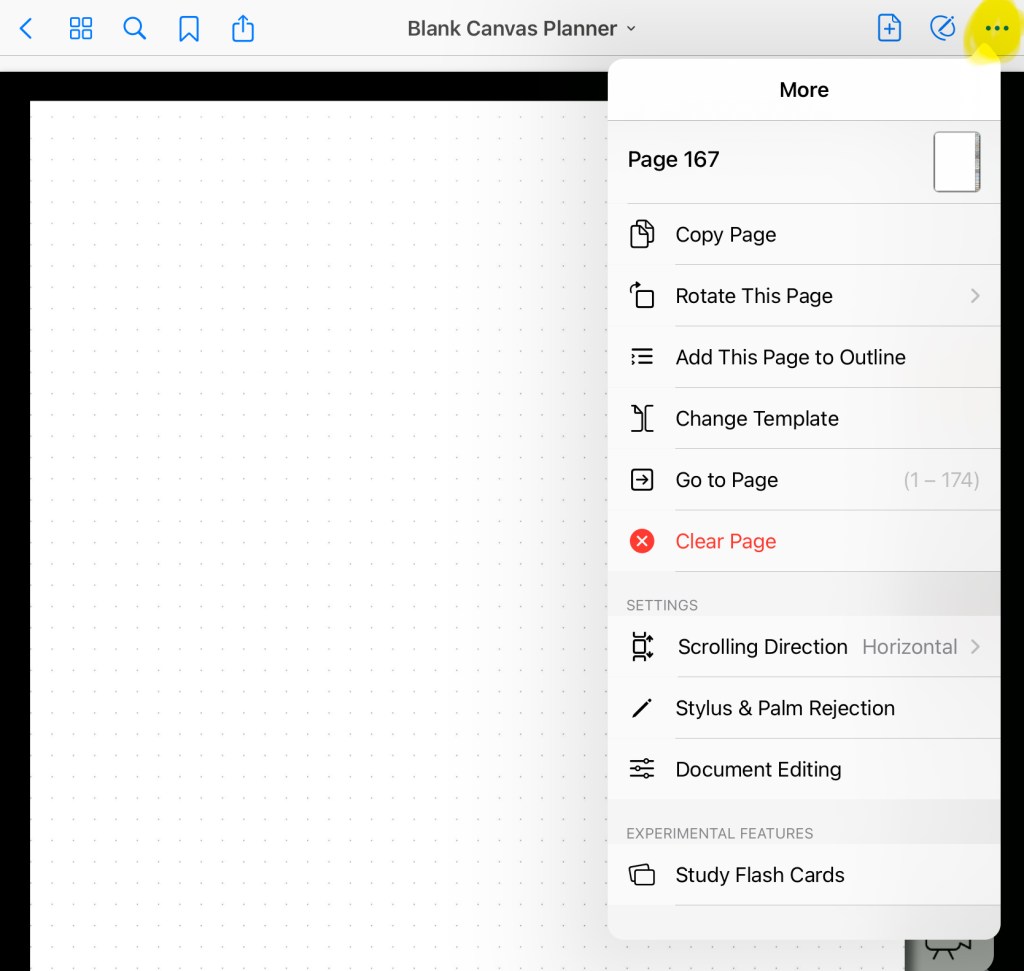
Method 2: Single Page View
Single page view is what it sounds like. Go to the page you want to copy and press the 3 little dots in the upper right hand corner to access your menu options.
Single page view does not allow you to delete a page. However, they have a handy function called “Clear Page” that will erase all the stickers, text, and handwriting you put on that page.
To copy a page, press copy page. Your copied page will not pop up automatically, like it would have in multi-page view.
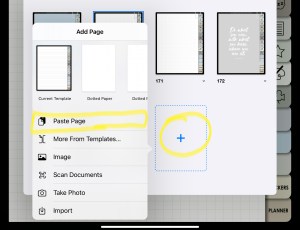
To paste the page, you will need to go into multi-page view again and press the + button. Select paste page from the pop up menu to add it to the notebook, then drag and drop it over to where you want it.
How to Add Stickers

Step 1: Enter Edit Mode
The edit button is located at the top right of your screen and will change its appearance based on whether you are in or out of edit mode.
You will need to be in edit mode to add and edit stickers.
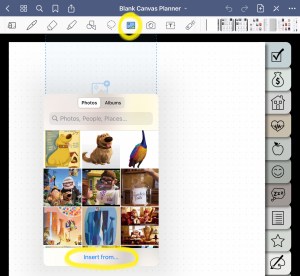
Step 2: Select the Photo Tool
Once you’re in edit mode, you’ll see a tool bar across the top of your screen. Click on the photo icon and then press anywhere on your screen.
A box will pop up and will usually show your most recent photos on your device. If your stickers are saved on your iPad, you can scroll into you find it and just click it to add it to the page.
If you’re like me and keep your images on a cloud, you will want to press the “insert from” button on the bottom of the box.
Step 3: Find your image
Clicking the “insert from” button will give you some options to choose your images from. (If you don’t see this screen, press “< ” on the top left side of the box until you see “< browse”. Then press that.)
Find your image, select it, and it will get added to your page.

Step 4: Resize your image
This is what it looks like when your image is added to the page. You can resize your image by press and dragging the arrows on the sides of the box.
Editing your Stickers

Use the lasso tool
I LOVE the lasso tool in GoodNotes. It makes things so much easier.
The lasso tool is that dashed squiggle on your tool bar. If you click on the icon, you can tell it what you want it to pick up; handwriting, text boxes, or images.
For example: say you wrote a note on a sticker that you want to move, but you want to leave the sticker where it is. You would tell the lasso tool to pick up your handwriting and NOT the sticker by touching the slider next to “Images” to turn it off. Now when you use the lasso, it will ONLY take your handwriting… not the sticker.

Copy, paste & resize stickers
Ok! So you have your lasso tool selected. If you just want to move a sticker, all you have to do is draw a circle on the sticker to pick it up and then move it where you want it. (You don’t have to circle the whole thing, the circle you draw just needs to touch it.)
To edit the sticker, draw a circle on it and then press and hold to get the menu bar. To copy and paste, choose “copy” first, then touch and hold the area you want to move the sticker to. Then select “paste” from the menu.
GoodNotes lets you select MULTIPLE items with the lasso tool, which is an amazing feature. You’ll be using this tool a lot for digital planning!

Leave a comment